...
| Note |
|---|
Make sure no samples are in the AGE system and insert a glass tube on each reactor of the AGE system. |
Pump down all reactors by activating all reactors and pressing the button ‘Evacuate’ on the ‘General’ tab.
Wait for 2 minutes.
From the runtime menu ‘Options’ select ‘Offset correction’
Start the logging on the AGE software’s ‘Protocol and Log’ Tab on the right hand side (button ‘Start Logging’)
By clicking on the valve button of the reactor that leaks (reactors 1-7 have the valves V0-V6 associated with them) close the valve of that reactor.
Wait for 10 minutes and write down the pressure in the reactor in question. If the leak is showing now (pressure increase of more than 1 mbar/minute), the leak is likely against atmosphere.
Proceed to: Fixing a leak to atmosphereIf the leak has not been visible with the first part of the test, continue as follows: Make sure the ‘vac/vent’ valve is set to the ‘Ar’ inlet, V8 and V9 need to be open. By doing so, the manifold connecting all the reactors should be at atmospheric pressure. Check if that is the case by looking at the pressure of any reactor that is not closed off. The pressure should be between 950 and 1020 mbar for most elevations.
Now wait for another 10 minutes and record the pressure increase. If the leak is showing now (pressure increase of more than 1 mbar/minute), the leak is likely through the valve connecting the tested reactor with the manifold.
Proceed to Fixing a leak through valve
Fixing a leak to atmosphere
Make sure the O-rings on the upper and lower tubes are in good shape. To check that, remove the O-rings by removing the cap nut on the bottom and top of the reactor. Carefully insert the glass tube and gently remove the O-ring by moving the glass tube sideways by 5-10° and then pulling the O-ring out. Check for tears and dirt on the O-ring and replace the O-ring if necessary. If the O-ring still looks intact but very dry, re-grease the O-ring with a very small amount of silicone grease from the EA-kit.
Reassemble the system and run another diagnosis.
If the problem is till there, the leak will likely be found at the joint of the reactor housing with the 1/16” capillary. In this case, apply some epoxy glue around the joint of the reactor and the capillary.
Run another diagnosis.
If the leak persists, contact Ionplus Support
Fixing a leak through valve:
If the leak is in the valve, we recommend you contact Ionplus Support to request a replacement valve.Navigate to the start menu of windows and start typing 'odbc'. If ODBC Data Sources (32-bit) appears continue with 3.
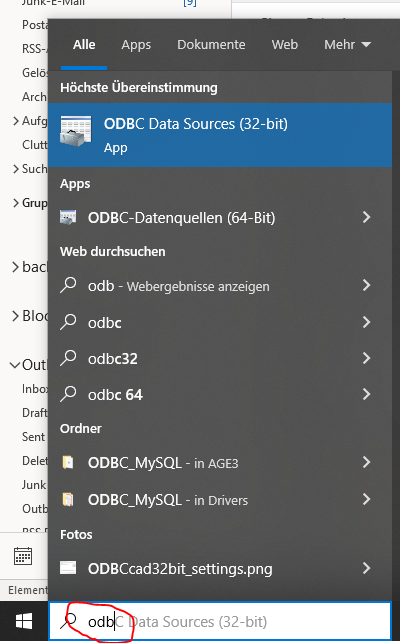
If you could not find the ODBC Data Sources (32-bit) navigate toC:\Windows\SysWOW64 and execute odbcad32.exe (32 bit version). If there is no executable to be found there. You will have to install it first. Download the installer from Microsoft or contact Ionplus for help.
Run the ODBC Data Sources (32-bit)
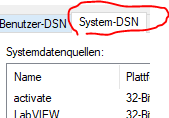
Select the System DSN tab.
Click on 'Add’ and select the MySQL ODBC 3.51 driver. The configuration window will pop open.
Enter a name that indicate the 32-bit ODBC version
Enter the IP Address of the DB server. This will be 10.11.12.100 from within the AMS' network. For outside access (if computer in a different lab) you will have to enter the AMS systems outside IP address.
Enter a username and password for a technical db account that has the permissions to write into the target_t table.
Enter db_ams for database: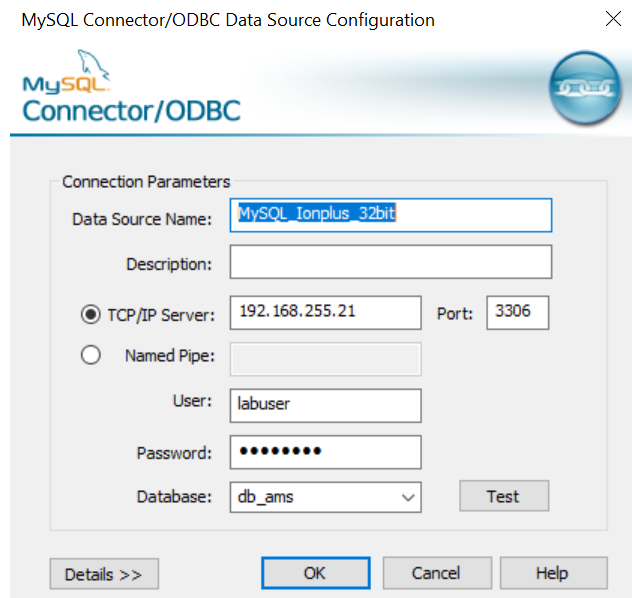
Click on Test to check if the connection works.
Save the settings with ‘OK’
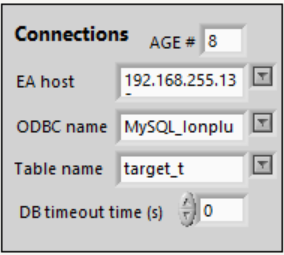
Now enter the Data Source Name in the AGE3/GIS software and specify table target_t:
\uD83D\uDCCE Related articles
...